
Making A Website With RStudio: The Blogdown Package
12 minutes read
Welcome to the first post of my blogdown blog! Although I started writing this post in November 2019, it’s still been in the drafts as of currently June 2020 😅. I figured the debut post would be best dedicated to sharing my personal experience of using this package as an R user with little to no background in web development.
Before starting a page, it’s helpful to have some idea of the difference between static websites vs. dynamic ones. Most websites people are probably best acquainted with are dynamic, which uses scripting language in the backend to process inputs provided by a user on the front end. Static websites, like the ones blogdown creates, don’t have those behind the scenes processes: the site is a product of fixed content on pages. They provide a simpler and minimal option for blogs or personal websites, which are primarily meant for documenting rather than having users interact with servers.
The static website workflow is basically as follows: 1. organizing the content of your site in a series of static files 2. using a static website generator to render these pages into a website 3. linking this to a platform that will deploy the website. Blogdown uses Hugo as its site generator.
The utility of markdown in RStudio plus the blogdown package allows writing files, serving and building the site all within the IDE: once you write and edit your site files, you can preview your page within the viewer and push your changes to Github with the version control addin, which then links with Netlify to deploy the website. Outside of blogdown, a typical workflow would involve installing requirements from the static generators, using a markdown editor to create the files and using command line to preview and push changes, which can be an overwhelming learning curve for somebody new to these tools.
It takes very few steps to have a website going (according to the blogdown book-it can be done in 10 minutes) without too much fancy web development knowledge. I did end up learning quite a lot of HTML and CSS and a bit of JavaScript along the way to make my page because I customized my theme a fair amount (not really reccomended by the blogdown book-whoops), but it was a personal preference and not something required to have a functional page.
If you’re interested creating a website of your own using blogdown, here are some concepts to know and fun things I’ve discovered while making this page.
Getting Started
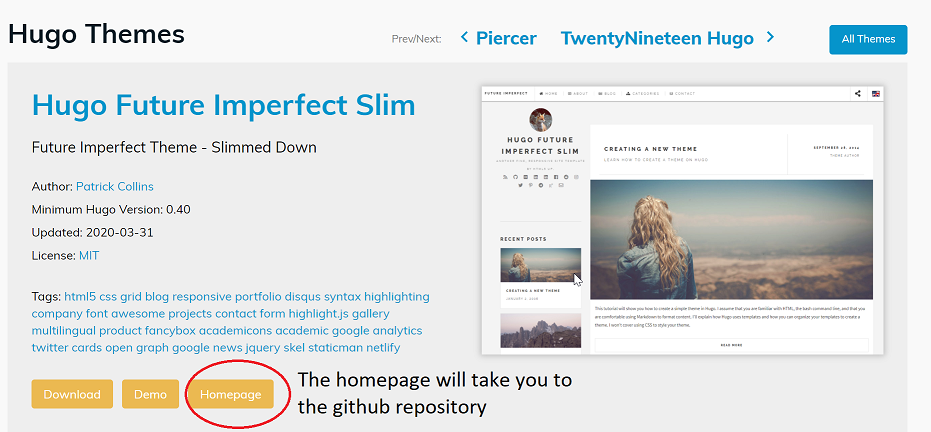
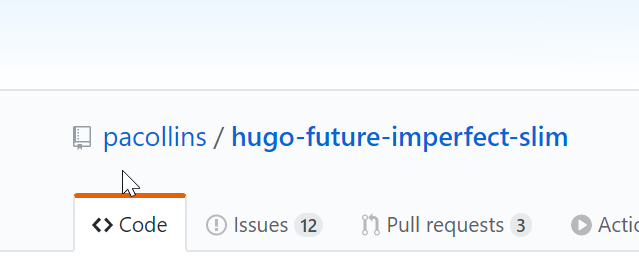
The first steps involve creating a new R project, installing the blogdown package and picking a Hugo theme for your page. I used Hugo Future Imperfect Slim, which needs to be specified by repository name in the theme= argument of the new_site() function that creates the blog. To find the theme’s repo on Hugo, navigate to the Homepage button:
The code I typed into the console was as follows:
# Install and call in the packages
install.packages("blogdown")
library(blogdown)

# Use the new_site() function to start a new site with theme = to the theme repository

blogdown::new_site(theme = 'pacollins/hugo-future-imperfect-slim')
Keep in mind you will need to link your local blogdown project to a repository on your Github. Either you can create the repository before creating the RProject and start a new RProject from version control. Or you can link the repository later in the project (for more on version control in R, you can read this article on the RStudio support page).
The Anatomy of a Blogdown Directory
After running new_site(), your project directory will have some version of the following files:

Every theme may have variable directories, so it’s best to refer to the theme’s documentation to understand the setup.
Most will have either a config file in either a .yaml, .toml or .json extension, otherwise known as “Front Matter” that determines the main features of your site.
The themes folder contains the directory of your theme and should be left unchanged. Direct changes to your theme will cause issues in site deployment. If you’re interested in changing parts of the theme, you can do so by copying folders or files in the theme directory and bringing them to your site’s main directory.
The content and static folders are likely going to be the most used paths of your blog. The content holds the blog posts as well as the files for other pages of your site. The static folder contains folders for add-on css and javascript files as well as an images folder for image files used throughout the site or on blog posts. Markdown syntax or an html tag when posting a picture on a post would look something like this:
# Markdown syntax for images. Make sure to add the / before the name of the image subdirectory in the static folder

# HTML img tag. The minimum you need is the src which is the filepath of the image. You can add alt = a description and width and height adjustments
<img src="/img/post/a_picture.png" alt="My picture" height="50%" width="50%">
Lastly, the public folder is a directory automatically created after you build the site through either the blogdown::build_site() or blogdown::serve_site() functions (I use serve_site() the most because I am constantly previewing my changes). The public folder pieces together all the site contents necessary for deployment.
Site Layout
Since the theme takes care of the site look and feel, understanding the layout is not necessary but something I found helpful to customize the template. Admittedly, exploring the layout as somebody who didn’t know much HTML, CSS or JavaScript beforehand took an incredible amount of time and effort, but was something I did out of interest of learning as I made the blog. If you have a specific purpose for your site and would like to deploy your blog quickly, you don’t need to know these details, and probably wouldn’t want to experiment too much in that regard.
However, if you’re curious what parts of the site directory manage the aspects of the appearance, the layouts or templates folder house the HTML scripts that determine the components and their respective location on the site. These scripts also store the variables set in the config file, allowing the templates to remain largely unchanged while the config manages most changes needed to be made to the site. When creating a new site, there was no layouts folder already in my main directory, so I had to make a copy from my theme’s directory. It’s really important to make a copy and not make changes directly through the themes folder because the site won’t be able to deploy if it can’t recognize the original theme.
The remaining aspects of the site layout are managed by CSS and JavaScript, stored in respective subdirectories under the static folder as .css and .js files. CSS is the look and feel complement to HTML that sets the colors and styles of the layout components. JavaScript allows adding optional dynamic features to enhance the usability of the site (the light/dark mode switch on my page, for example, is created by JavaScript).
Writing A Blog Post

The blogdown package has a convenient add-in feature similar to what would be available in a blogging website that enables defining most of the post’s metadata upfront. A blank .md or .Rmd document is then generated with the front matter populated based on what was entered in the add-in.
an example of the post’s metadata generated at the beginning of the document
---
title: 'Making A Website With RStudio: The Blogdown Package'
author: ''
date: '2019-11-23'
# the date-automatically generated from the add-in
slug: making-a-static-website-using-blogdown
# the slug is the name added to the hyperlink of your page for this specific post. Also automatically generated from the add-in
categories:
  - r
  - web development
# categories generated from the add-in
tags:
  - blogdown
  - javascript
  - html
  - css
  - jekyll
# tags generated from the add-in
description: ''
linktitle: ''
type: post
draft: true
# put this to prevent it from deploying if still in draft mode
---
To save the post as a draft, adding draft: true at the end keeps it from deploying when serving the website to make any other changes. You can remove that line once you’re ready to deploy.
Writing a blog post is essentially just like typing up any markdown document. You can use both markdown syntax or HTML tags to format text and add pictures. To add code blocks, you can insert code in between three backquotes or insert text between single backquotes for inline code.
Previewing-Building-Deploying
If you want to preview your website, all you have to do is save changes to your files and run blogdown::serve_site() that will run the site on a local server. The preview appears in the Viewer tab in the IDE, but can be extended into a web browser after clicking the “show in new window” button. Alternatively, you can run blogdown::build_site() if you don’t want to preview (the differences between the two are better explained here).

One thing to keep in mind is that after running the serve_site() command, it re-runs automatically everytime you save new changes to your site files. If you like to continuously preview your site and have it open in multiple tabs on a browser window, the save button eventually freezes at some point, in which case, you should close out of those tabs as you preview.

As you work with your site and make changes, it’s good practice to commit your changes using git. If you are brand new to git, some helpful references are the git reference manual and Happy Git With R.
In R, there are two ways to commit changes. Either you can use the git add-in or terminal to write the commands. The general workflow for your blog will be as follows:
Add your changes to staging (pre-commit)
In the git add-in:
- Select the changes you want to stage to commit (if you want to add all the changes, select one and hit
CTRL+Ato select all) - Click staging
Alternatively, in the terminal:
git add path/example.md # If you want to add a specific example.md file
git add -A # If you want to add all changes
Commit your changes (with a message so you can keep track of what you’re doing)
Once you have added your changes to staging, you want to commit your changes. You should add a short message that specifies what changes you made. In the git add-in, you can add a message or check “amend previous commit” that will automatically populate with the same if you’ve already committed changes previously.
Alternatively, in the terminal:
git commit -m "add your message here" # If you're making a new commit
git commit --amend # If you're amending a previous commit
Pull (update local repository from remote repository)
Git pull makes sure that your local repository matches the remote repository before you make the changes to your local repository and send it back to the remote. If you don’t have anything on your remote repository or have not pushed anything from local to remote previously, likely you will have nothing to pull, but this is the general sequence before pushing the changes you made on your local to the remote repository.
In the git add-in, you can pull using the blue arrow facing down. Alternatively, in the terminal:
git pull
Push (update remote repository from local repository)
Once you have ensured your local repository matches the remote repository, you’re ready to push your changes to the remote repository.
In the git add-in, you can push using the green arrow facing up. Alternatively, in the terminal:
git push origin master
Creating a Netlify account to deploy page
If you haven’t already created a Netlify account, you should do so once your remote repository contains all your blog’s static files and is ready for deployment. Once you create an account, Netlify reads in your repository, specifically looking for the public folder created after serving your blogdown site. As mentioned previously, you want to make sure that you haven’t made any changes to the original themes folder of your site which would cause the deployment to fail. If everything is good to go, you should have a running website!
You can choose your own domain name however you’d like if you decide you want an alternative to the .netlify.com domain. I decided to use the .rbind.io as I mainly made a blogdown for R and related statistics and programming posts (first time I was able to pick my first name without the username being taken!).
Cool Stuff You Can Add to Your Page
Dark/Light Mode Switch


I noticed some themes already have a dark/light mode switch built into the template that enables changing the contrast of the theme, so I wanted to add one to my own page. This easy to follow tutorial goes over all the Javascript, HTML and CSS elements to create your own!
Favicon

A favicon is a little icon that identifies your page, which is probably most noticeable when you have fifty tabs open on your browser at once. It’s a small detail I didn’t pay attention to until I deployed my website. The theme I used includes a true/false option in the config file that either enables or disables the favicon HTML code already included in the template, so after setting it to true I generated the icon using https://realfavicongenerator.net and put the accompanying files in the static folder for it to show up on my page’s tabs.
Highlight.js
# An example of HTML code available in the highlightjs.org/static/demo page. I am using theme Dracula
<!DOCTYPE html>
<title>Title</title>

<style>body {width: 500px;}</style>

<script type="application/javascript">
  function $init() {return true;}
</script>

<body>
  <p checked class="title" id='title'>Title</p>
  <!-- here goes the rest of the page -->
</body>
Because I have previously written most code either on RStudio or other IDEs, I had never really considered the conundrum of writing code in HTML generated blocks that wouldn’t have built-in syntax highlighting. Highlight.js is a syntax highlighter developed using Javascript that avoids having to come up with your own configurations for highlighting code. It has over 90 styles, which I also contributed to after learning about it while creating this page!
Adding Copy Buttons to Code Blocks
# You can copy this text with a button :)
When browsing blog sites while learning R or other programming/statistical things, I noticed it was always helpful to have a copy button readily available on code chunks. Similar to the dark/light mode switch, creating one involves elements of HTML, CSS and Javascript-the latter which is still very elementary to me. This tutorial here does a great job of walking through the steps to include one on your own page.